In a perfect world, your application is continuously deployed, always monitored, and never down. But the reality is that applications can go down, and the impact to a business for even a single hour of downtime can be very costly. When an application doubles as the digital storefront to a business, it’s even more important.
In 2021, Shopify released Hydrogen, a React-based framework for building custom storefronts based on modern capabilities, best practices, and the latest tooling in web development. Oxygen, meanwhile, is our hosting platform for Hydrogen-based custom storefronts. It gives developers the performance, security, scaling, and stability they need to focus on developing storefronts, not maintaining infrastructure.
To make deploying customer storefronts to Oxygen as simple as possible, we opted to use GitHub Actions. By default, any Hydrogen storefront repository (repo) integrated with Oxygen will be injected with a GitHub Action workflow. All it takes to deploy is a push of the button.
The workflow we developed is obviously purpose-built for our customers’ needs, but any organization could benefit from our approach, whether you’re to deploy your team’s own code to the cloud, or if you want to help customers deploy custom versions of your product to your infrastructure.
Before getting into the details of our GitHub Actions workflow and how custom storefronts use them, we’ll briefly explain what custom storefronts are and how they differ from a traditional online storefront on Shopify.
What are custom storefronts?
Shopify has always offered an online store for all of its merchants. Most online stores leverage Themes to customize the look and feel of their website to find something that best suits their business. Themes, by design, only allow for modifying visual elements of an online store. Deep customizations such as how caching is handled, or calling a specific API, is not allowed. This is because online stores have a very tightly coupled front-end and back-end.
Custom storefronts (or headless commerce), refers to decoupling the front-end (the ‘head’) from the back-end (the ‘body’) of a storefront. The ‘head’ refers to anything the buyer interacts with, like the buttons you click, the page you scroll through. The ‘body’ refers to the back-end, which handles commerce related tasks such as shipping, inventory management, and discounts.
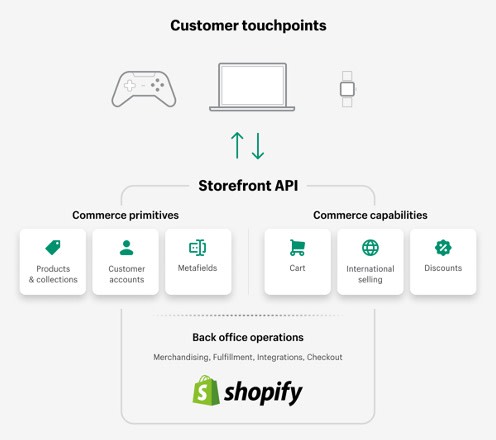
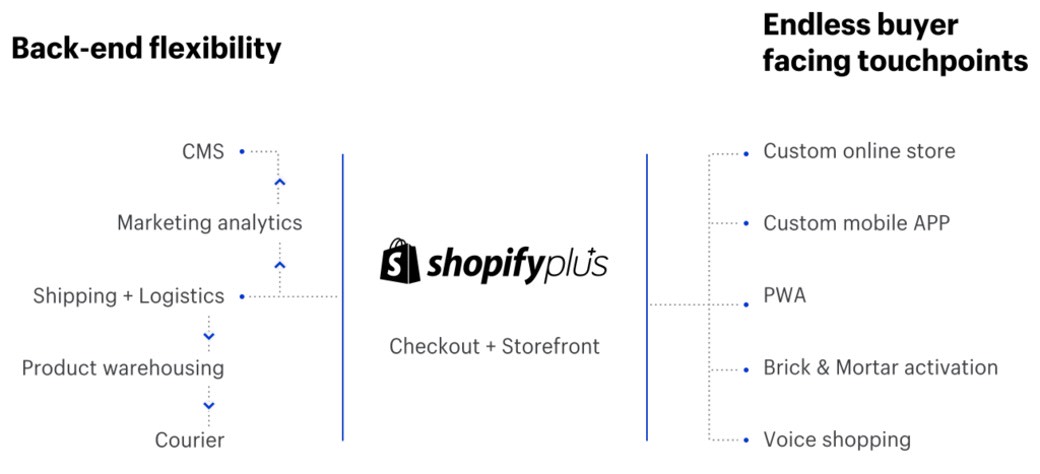
Custom storefronts allow for an online store to be decoupled from its back-end. Leveraging commerce-focused back-end operations to provide endless customer touch points. Image source.
In recent years, there have been changes in the way we shop online. Going to a store’s website is certainly the most popular way to shop, but more and more customers are purchasing products using a smartphone, smartwatch, or gaming console. With a custom storefront, you ensure that your store is being served on the best medium for your customers.
Hydrogen is Shopify's React-based, opinionated approach to building a custom storefront. You can learn more about its features here. Hydrogen is built on top of React and provides a number of features including:
Built-in caching controls to handle dynamic content and minimize API calls for speed and performance.
Server-side rendering to optimize the initial load.
Hydrogen includes Shopify-specific components, hooks, and utilities for commerce.
What is Oxygen?
If you built a custom storefront today, you’d have to choose a cloud provider to host it, create a CI/CD pipeline, monitor performance and uptime, and manage any additional environments (such as a staging or preview environment).
Oxygen does all of this for you. Storefronts built with Hydrogen can run directly on Shopify’s data centers around the world. Having apps live alongside our data and APIs means we can give some of the best performance characteristics of storefronts on the web today. By partnering with Cloudflare, leaders in workers running at the edge worldwide, a custom storefront is only ever milliseconds away from customers.
How do custom storefronts use GitHub Actions?
When a merchant creates a custom storefront, they can either provide an existing GitHub repo or create a new one. Once a repo is associated with a custom storefront, Shopify will drop in a GitHub Actions workflow that, by default, runs on every commit. The workflow will install Node.js, install any dependencies, create a production build, push assets to Oxygen, and create a GitHub deployment.
Deciding on a CI/CD platform is never easy, but there were three main reasons why the Shopify team decided to provide a GitHub Actions workflow by default. First, it’s where developers are: Creating a workflow based on GitHub Actions meant that we would decrease the chance of a developer having to learn something new, which keeps their developer experience positive. The second is performance: Users can choose to run with performant GitHub-hosted runners or use their own self-hosted runners and scale accordingly. And third, we were able to reuse existing integrations that were built for Shopify Themes.
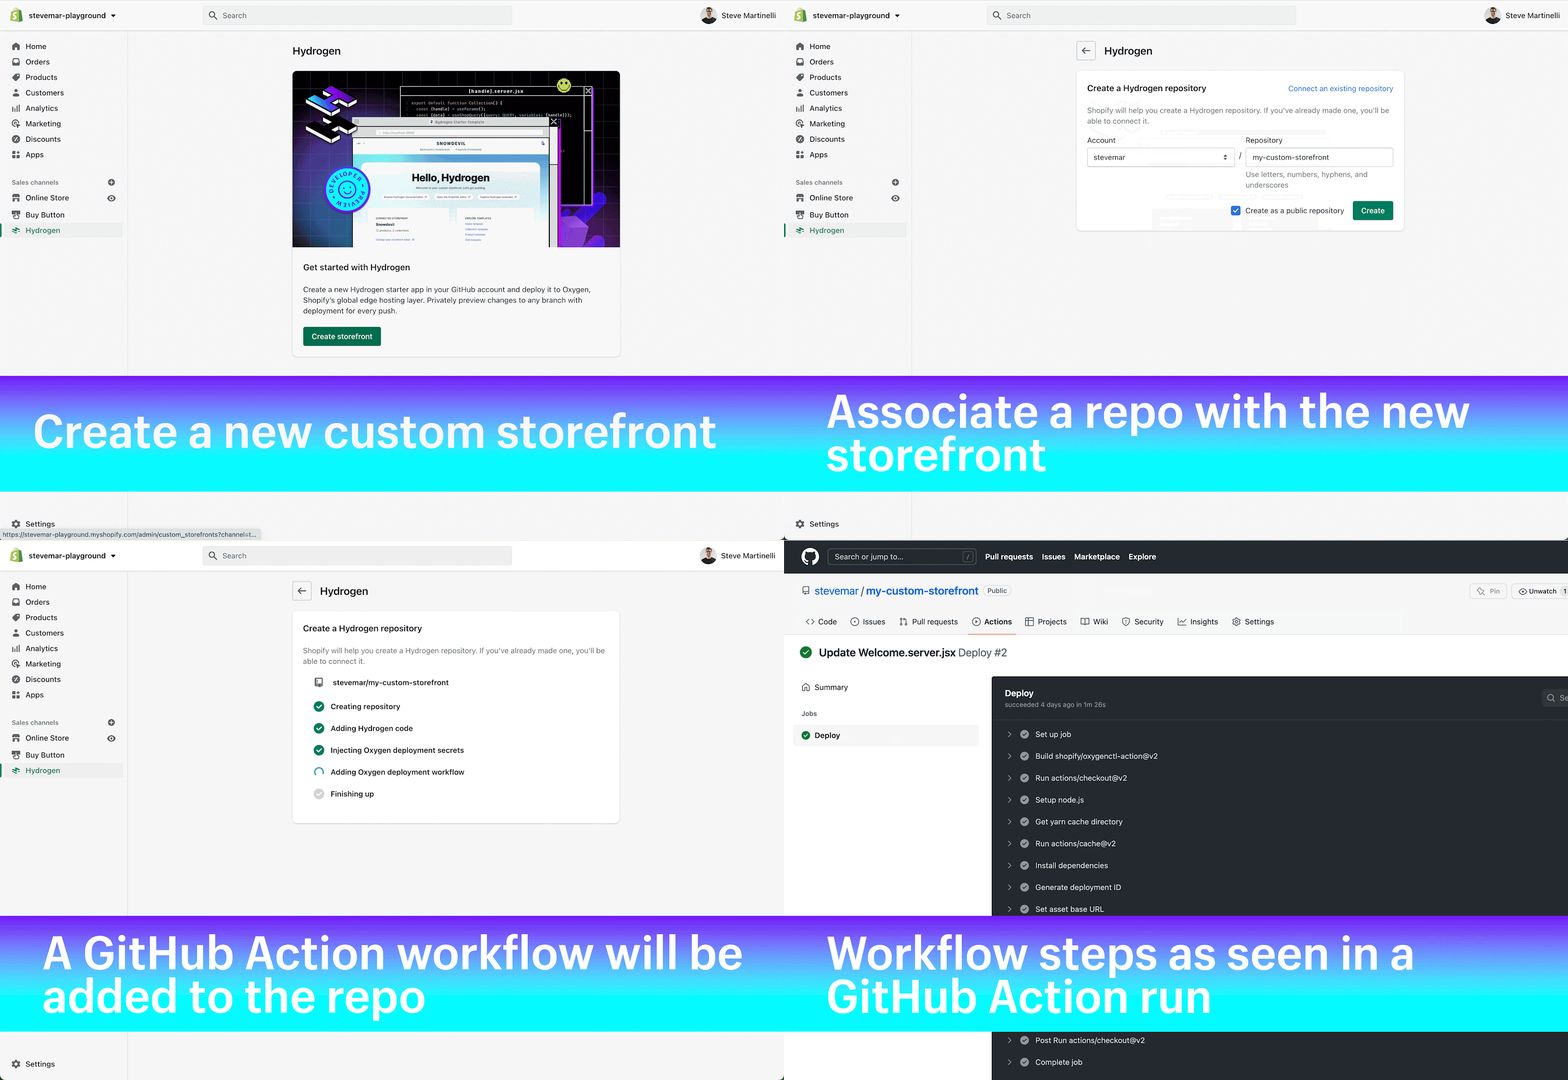
Creating a new custom storefront, associating it with a repo, and showing a GitHub Actions log.
Let’s break down the two most important sections of the workflow.
Pushing assets to Oxygen
Once the custom storefront has been built, assets need to be pushed to Oxygen servers to be accessible on the broader internet. Shopify created an open source GitHub Actions, oxygenctl-action, to do just that.
- name: Pushing assets to Oxygen
id: deploy
uses: shopify/oxygenctl-action@v2
with:
deployment_id: ${{ steps.deployment-id.outputs.ID }}
oxygen_deployment_token: ${{ secrets.OXYGEN_DEPLOYMENT_TOKEN }}
Using the pre-configured deployment token, and details about the commits (such as timestamp, hash, and message), this action creates a unique deployment by pushing the built assets to Shopify’s Oxygen servers.

Deployment to push the built assets to Shopify's Oxygen servers.
Creating a GitHub deployment
With the assets uploaded to Shopify’s Oxygen servers, the last step of the workflow is to create a GitHub deployment. Shopify once again created an open source GitHub Actions, github-deployment-action, to do that.
- name: Creating a GitHub Deployment
uses: shopify/github-deployment-action@v1
if: always()
with:
token: ${{ github.token }}
environment: 'preview'
preview_url: ${{ steps.deploy.outputs.url }}
description: ${{ github.event.head_commit.message }}
This Actions result in creating a deployment that is viewable from both the Shopify platform and the GitHub repo. You can check out our code and use it as a template for building your own deployment action.
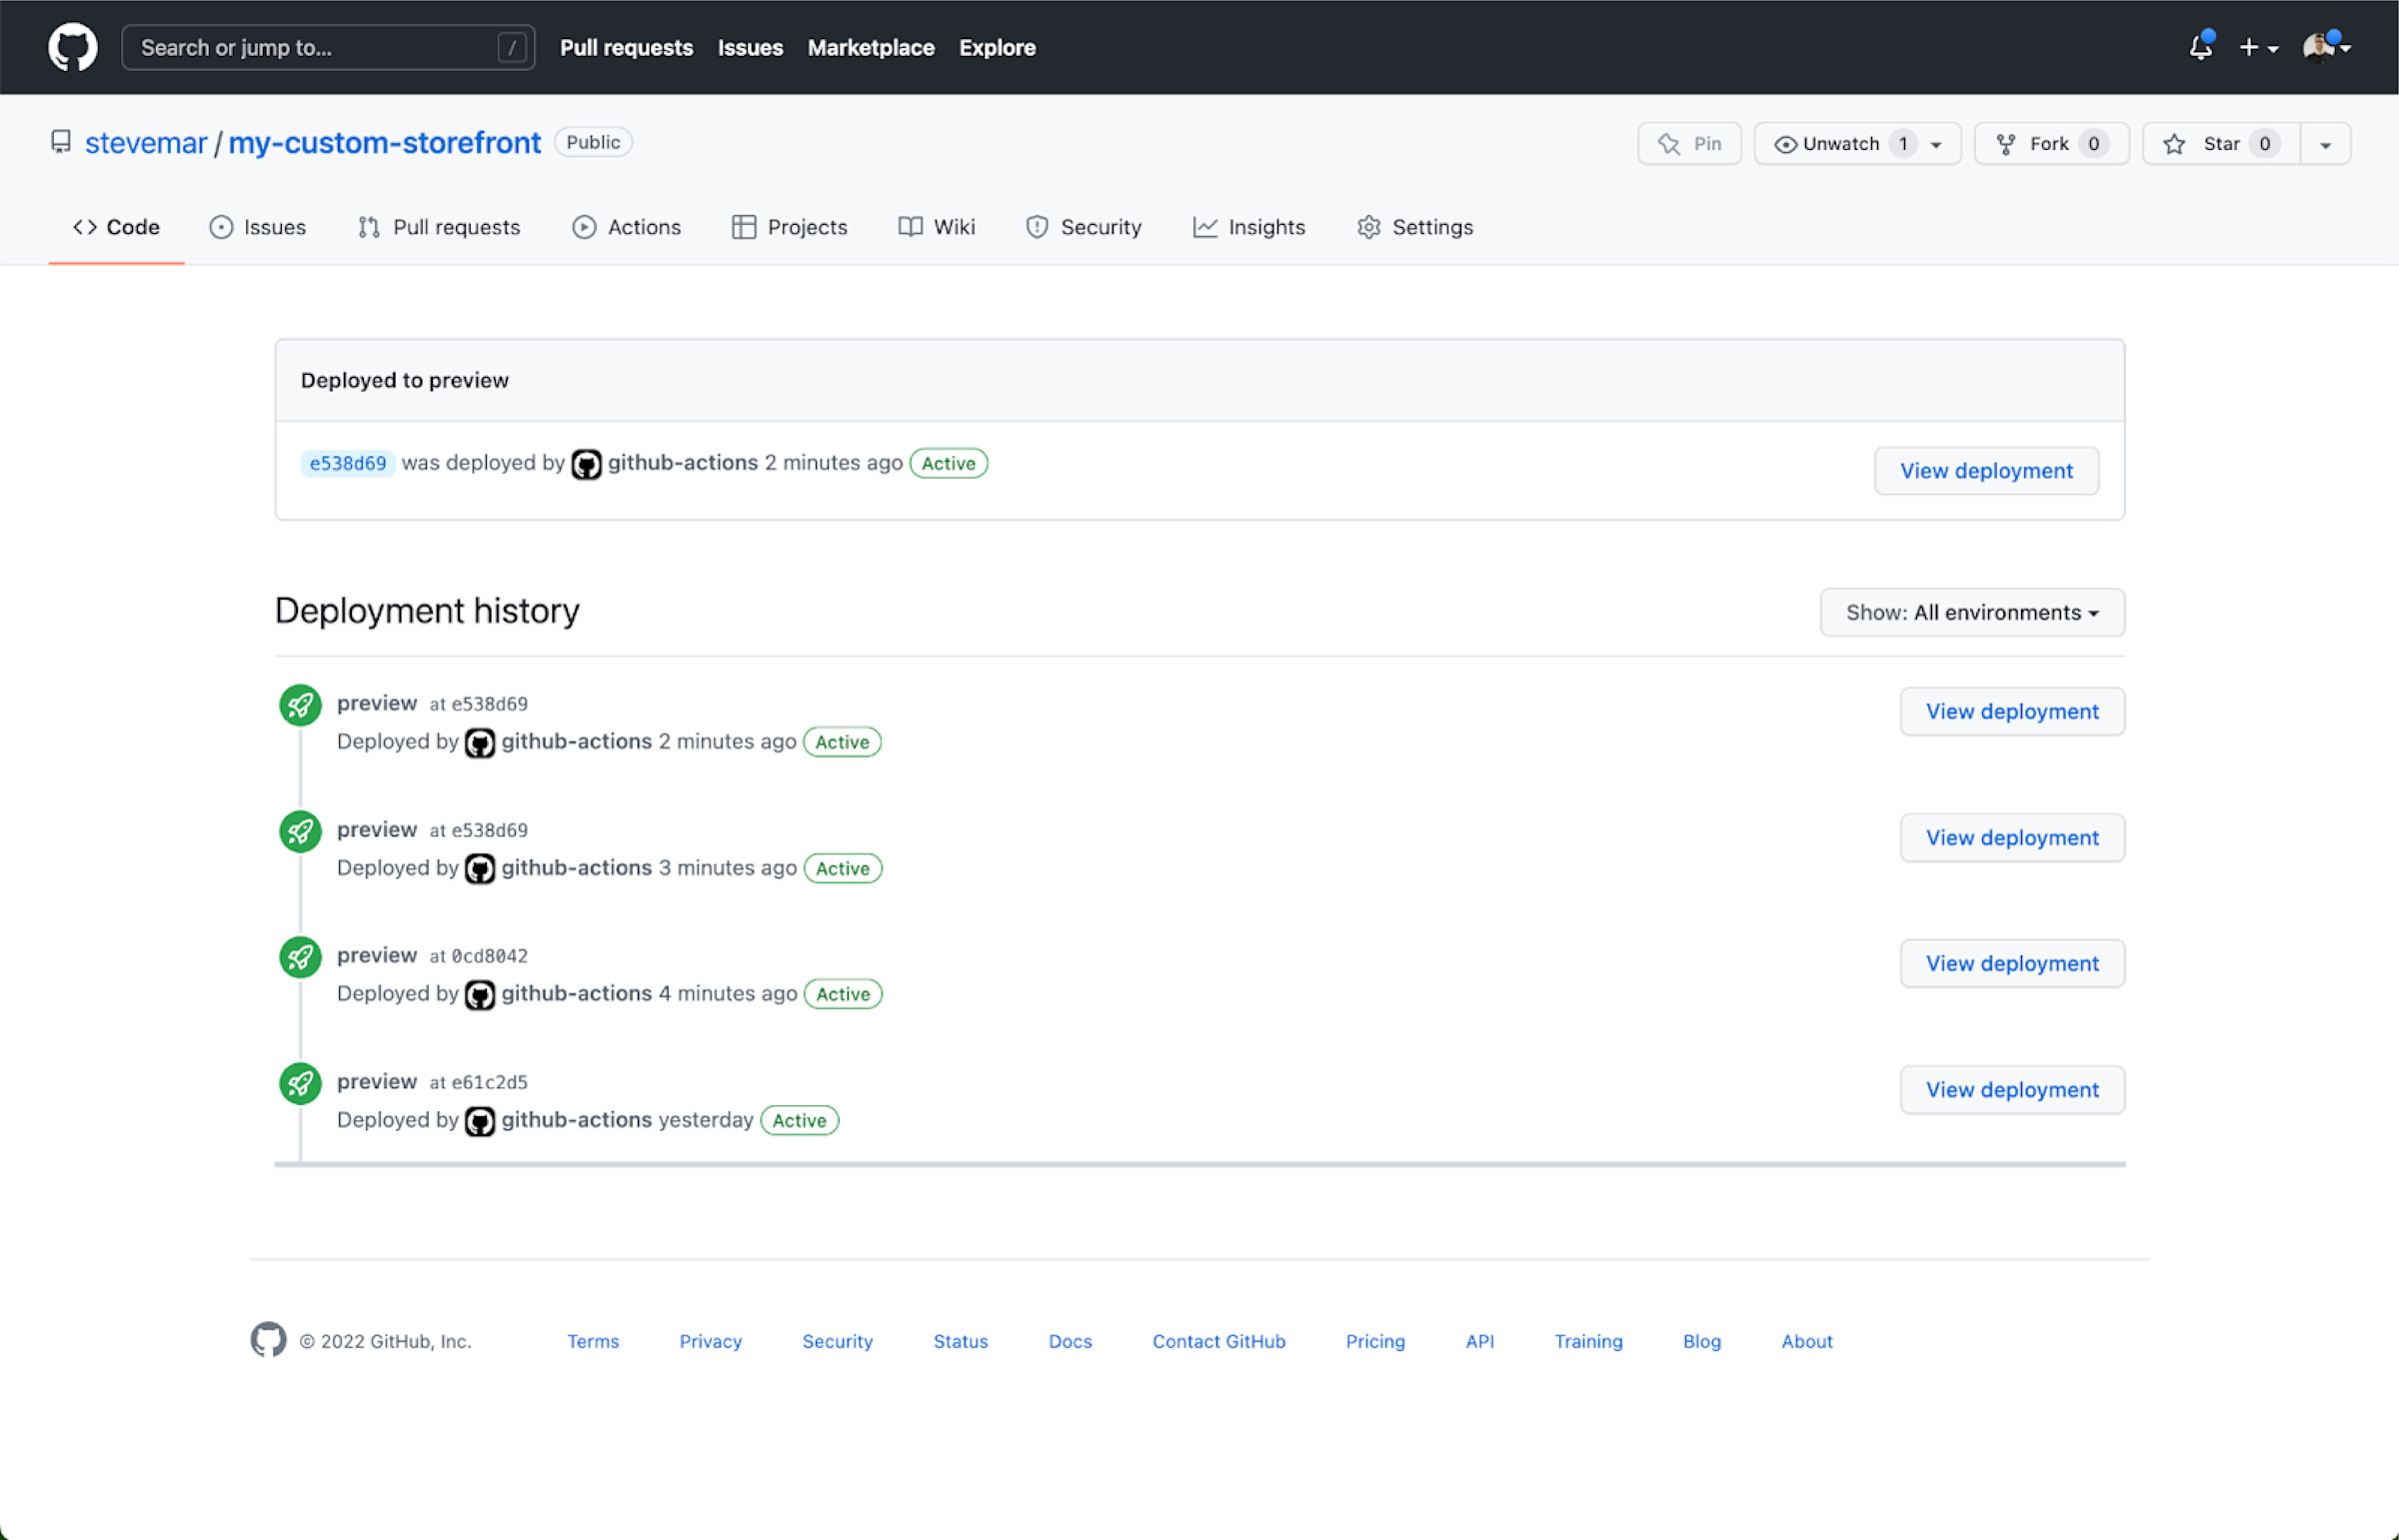
Deployments as seen in the GitHub repo.
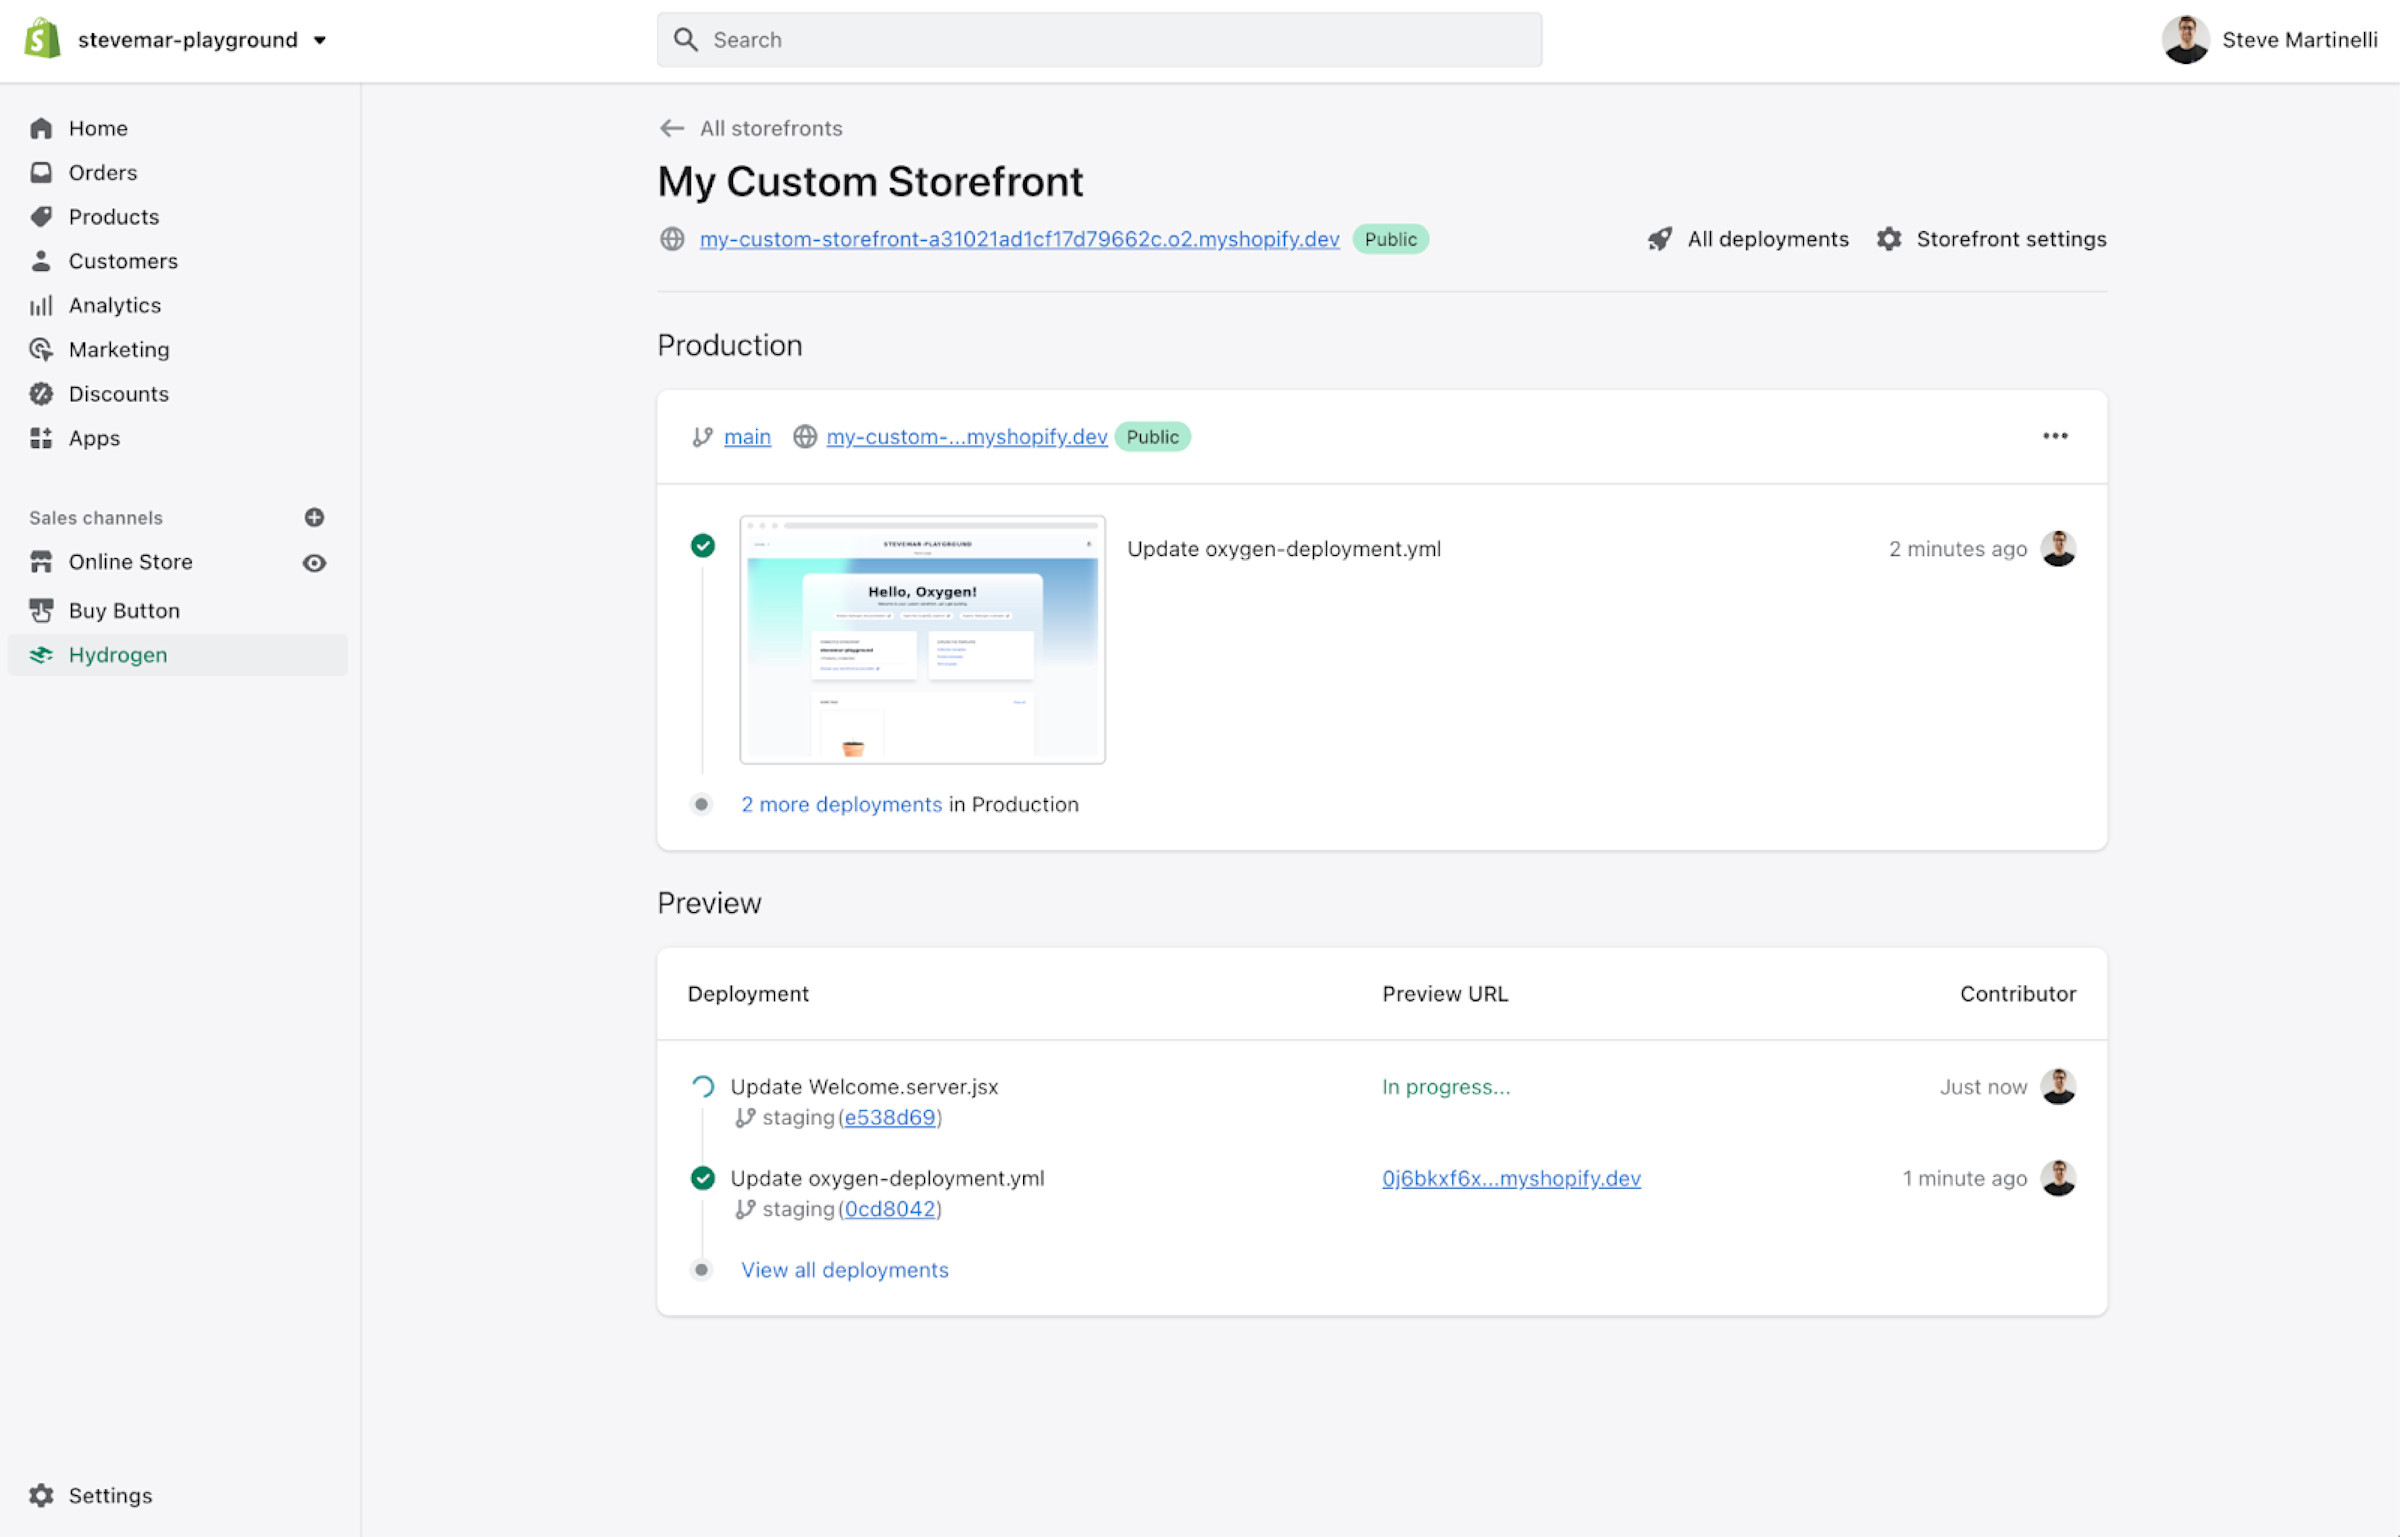
Deployments as seen in the Shopify platform.
If you're building your own deployment pipeline with GitHub Actions, here are a few things to keep in mind:
Determine what steps are shared across all deployments and which are optional or only apply under specific circumstances.
Collect data to understand how different users will structure their repos so you can set defaults for the most common formats while exposing optional configuration for the less common structures.
Think through the many ways the workflow can go wrong. What timeouts are set if a synchronous request hangs? What steps can you eliminate to reduce errors and time to feedback?
If you’re deploying workloads from outside your organization, keep in mind that different tiers of any given GitHub account have different limits in terms of how many workflows can run per day or how long Actions can run.
Where can I learn more about Hydrogen, Oxygen, and Shopify?
To find out more about the Oxygen and Hydrogen, or some of the repositories and GitHub Actions referenced in this article, check out the following resources:
You can also dig into some of the other interesting articles Shopify’s infrastructure team has written about, like how we teamed up with Let’s Encrypt to secure Shopify’s 4.5 million domains, or how we performed over 11 million queries per second during the 2021 Black Friday/Cyber Monday weekend.


